Introduction
Several years ago, it was uncommon for a person on a ventilator to live at home. It was thought that non-medical people did not have the skills necessary to operate this machine. Times have changed, and because people on ventilators with spinal cord injuries are living long, healthy and full lives, it has become important to teach families about ventilator use in the home.
With a little training and practice, most people can learn how to care for a person who is on a ventilator at home.
This lesson will explain important issues about the ventilator. There are many other skills related to caring for a person on a ventilator such as suctioning, trach care, assist coughing and using an In-Exsufflator. All of the information about these areas can be found in the lessons of this Module. Please review them as well.
What is a ventilator?
A ventilator is a machine that moves air through a person’s lungs. It is attached to a trach tube in the person’s throat. It blows air or air with extra oxygen into the lungs. It has many settings and alarms. Each person’s ventilator will use different settings that are determined by the doctor. Some people need a ventilator all of the time while others only use it part of the time. It depends on the person’s needs and the doctor’s orders.
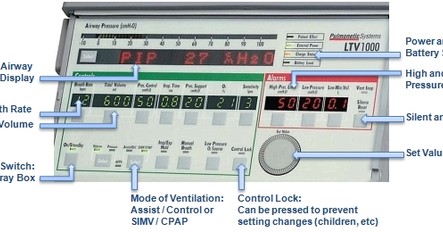
This is a common type of home ventilator. Yours may differ depending on your supplier. Always refer to your owner’s manual and your home care company for operating instructions.
Why is a ventilator necessary?
Because the spinal cord and its nerves help control breathing, people with a spinal cord injury in the neck area may require a ventilator. The ventilator assists with breathing by helping the diaphragm, abdominal and rib muscles move to allow air in and out of the lungs. Helping these muscles also provides the body with the ability to cough and move mucus out of the lungs and throat.
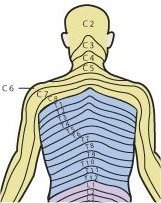
The nature of a person’s breathing problems will depend on the level of injury, the person’s general physical condition and whether the person was a heavy smoker.
People with a C1 or C2 injury will require a ventilator all of the time because the injury is so high in the cord that it cannot send any messages to the diaphragm, rib or abdominal muscles.
People with C3 injuries may need a ventilator all of the time or part of the time.
People with C4 – C8 injuries may not need a ventilator at all but are still at high risk for breathing problems.
What do the controls do?
- On/Off Switch: This switch is located at far left of the bottom row on the machine pictured. The gray square box must be pressed to turn the machine on or off. If you have two portable ventilators at home, keep one plugged into an electrical outlet at the bedside. The second portable ventilator should be hooked up to your power chair and connected to the chair battery.
- Mode of Ventilation: The doctor will determine which method of ventilation will best benefit the patient’s respiratory system. The doctor will order either the Assist / Control or the SIMV / CPAP mode.
- Breath Rate: This controls how many breaths are given each minute. The number of breaths will also be ordered by your doctor. It is important to always check the rate to make sure enough breaths are being given.
- Tidal Volume: This controls how much air is given in each breath. The setting is ordered by your doctor. It is important to know the tidal volume setting when doing routine ventilator checks.
- Inspiratory Time: This controls how fast to deliver the set tidal volume during inhalation. The respiratory therapist will set the time.
- Pressure Support: The Pressure Support control can only be used in the SIMV / CPAP mode, to help wean the patient off the ventilator. This control supports each spontaneous breath the patient takes by providing extra pressure, reducing the amount of work needed by the patient to breathe. This setting is ordered by the doctor.
- Oxygen: This control will read 21% oxygen unless the patient is receiving extra oxygen in the hospital setting.
- Sensitivity: This allows the ventilator to be set according to the person’s breathing effort. The ventilator can provide 100% of the breathing work or it can be set to “assist” a person who has some breathing ability. This setting will be set by the respiratory therapist.
- LOCK will lock the settings. This control will safeguard against children changing ventilator settings in the home.
What do the alarms do?
Alarms are indicators that will let you know if something is wrong with the ventilator. When an alarm sounds, it is important that you respond to it immediately.
Here are some immediate actions you can take:
Check the person to make sure they are not in distress. If they are, take them off the ventilator and use the Ambu Bag to breathe for the person. Bag the person until you find the problem. If the ventilator tubing has popped off the trach tube, simply re-attach it. If it is not something obvious, continue bagging the person and begin checking the tubing, starting where it connects to the person, and examine the tubing all the way back to the machine. If the tubing has become disconnected, re-connect it.
Check the trach cuff as you were taught. If it is low, insert a little more air and see if this stops the alarm. If you still cannot find the problem, keep bagging and call 911 for help. You will also need to call your home care company and respiratory therapist after the emergency situation is over.
- High-Pressure Limit: This alarm tells you that there has been an increase in air pressure delivered to the lungs. It could mean that the person has too much mucus in the lungs and needs to be suctioned. It can also mean that the ventilator tubing has become kinked.
- Low Pressure: This alarm tells you that there has been a drop in air pressure delivered to the lungs. It could mean that the ventilator tubing has popped off the trach tube, that there is a leak or that a piece of tubing has become disconnected. It may signal that there is a problem with the trach cuff. While this is not a ventilator problem, the alarm will still sound because there is not enough air pressure being given to the person.
- Low Min. Vol: This setting will be set by the respiratory therapist. When this alarm sounds, it indicates that the lung volume has dropped. Check the trach cuff pressure and examine the ventilator tubing for a leak.
- Silence / Reset: This control performs two functions:
- Silence: When pressed to silence a ringing alarm, it will do so for 60 seconds. Silence should only be pressed after a problem has been fixed.
- Reset is pressed to return the ventilator back to the patient’s usual settings.
- Set Value dial: This is the large gray dial below the alarm section. When any of the settings on the control panel needs to be changed, the gray square box under the setting must be pressed, and then the Set Value dial is used to reduce or increase the setting. During this process, the setting number will be highlighted and the rest of the numbers on the panel will be dimmed. Once the desired number is set, press the gray square box again. To prevent unintended changes to the settings, the CONTROL LOCK can be pressed to lock the settings. This control will safeguard against children changing ventilator settings in the home.
The Low-Pressure number and Low Minute Volume numbers will blink when there is a disconnection or leak. If this happens, check the connection at the trach and all tubing connections. Check the cuff pressure of the trach tube. It might need more air. Move the vent tubing to make sure it is lying on the patient’s chest. The high-pressure alarm will beep when a patient needs to be suctioned.
An increase in the PIP level above its normal level also means that the patient needs to be suctioned.
Airway Pressure Display: This is the long, rectangular window that, when “Select” is pressed, will display several pieces of information. For example, the three most important homecare readings are PIP, for airway pressure, exhaled tidal volume and breath rate. An increase or decrease in airway pressure (PIP) can indicate that the patient needs suctioning or has an airway leak. The exhale tidal volume might need to be monitored if the patient is weaning off the ventilator.
Power Indicator (upper right-hand corner on the front of the ventilator)
- During the daytime hours, while the converter box is on, the EXTERNAL POWER LIGHT should be ON and GREEN.
- During the nighttime hours, while the ventilator is being charged, the CHARGE STATUS light will blink until it is fully charged, then it will become a STEADY AMBER LIGHT.
If the person is using oxygen, please note the following:
- Never smoke while oxygen is in use.
- Never place oxygen equipment near heat, electrical appliances (battery shavers are OK) or the furnace.
- Never use petroleum jelly products (like Vaseline) on oxygen equipment or the person.


